Quick Answer: To build a uromastyx enclosure, you need a basking surface of 120–135°F (49–57°C), a T5 HO 12% UVB tube, humidity held at 10–25%, and at least 4–6 inches of loose substrate for burrowing. Minimum floor space depends on species — 48” × 24” for small adults up to 96” × 36” for Egyptian uromastyx. Build in wood or PVC with front-opening doors; glass tanks can’t hold the heat these animals require.
Knowing how to build a uromastyx enclosure correctly from day one matters more than it does for most reptiles. These are extreme desert baskers that live 15–20 years, and a poorly designed setup creates slow, chronic health problems — the kind that are easy to miss until real damage is done. Get the basics right once and you won’t be tearing everything apart two years in.
What a Uromastyx Enclosure Actually Needs
Key Parameters at a Glance
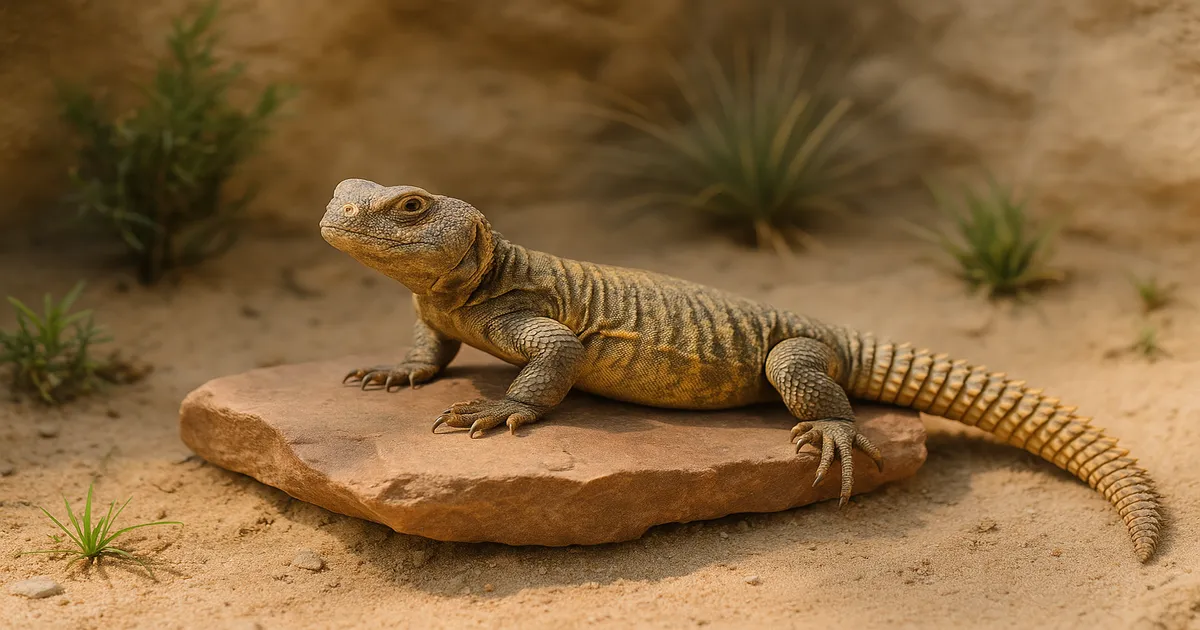
- Basking surface: 120–135°F (49–57°C) — measured with an IR gun on the rock, not in the air
- Warm side ambient: 95–105°F (35–41°C)
- Cool side ambient: 80–90°F (27–32°C)
- Nighttime low: No colder than 65–70°F (18–21°C)
- Humidity: 10–25% RH
- UVB: T5 HO 12% or 10.0 bulb, UVI 4.0–6.0+ at the basking zone
- Substrate depth: 4–6 inches (10–15 cm) minimum
- Enclosure type: Wood or PVC, front-opening
Uromastyx come from some of the hottest, driest places on Earth — the Sahara, the Arabian Peninsula, rocky desert flats across Iran and the Middle East. Wild surface temps regularly exceed 140°F (60°C) in summer. Their physiology is built around intense heat and UV, and a setup that falls short doesn’t just limit them — it actively makes them sick. A basking surface below 115°F means poor digestion, immune suppression, and metabolic disorders that compound over years.
Choosing the Right Enclosure Size
Minimum Dimensions by Species
Floor space drives thermoregulation. The animal needs enough room to move from a scorching basking zone to a genuinely cool retreat — that temperature swing is how they regulate body temperature throughout the day. Cramped enclosures compress the gradient and make proper thermoregulation impossible.
| Life Stage / Species | Minimum Dimensions (L × W × H) |
|---|---|
| Juveniles (under 8”) | 36” × 18” × 18” (91 × 46 × 46 cm) |
| Small adults (U. ornata, U. geyri) | 48” × 24” × 24” (122 × 61 × 61 cm) |
| Medium adults (U. acanthinura, U. maliensis) | 60” × 24” × 24” (152 × 61 × 61 cm) |
| Large adults (U. aegyptia) | 72”–96” × 24”–36” × 24” (183–244 × 61–91 × 61 cm) |
Bigger is always better. If you can build or buy something larger than the minimum, do it — you’ll never regret the extra space.
A 36” × 18” starter enclosure works fine for a young animal, but plan to upgrade before 12 months. Juveniles that grow quickly in cramped conditions will show it in their behavior — reduced basking, hiding more than they should, general restlessness.
If you’re keeping a male-female pair, add at least 25–30% more floor space over the single-animal minimum. Two males cannot be housed together, full stop. Those fights are often fatal, and it’s not a risk worth taking even briefly.
Wood, PVC, or Glass: Which Enclosure Type to Build
Custom Wood Builds: Best Value for Most Keepers
A custom wooden enclosure is the right call for most people — cost-effective at large sizes, holds heat well, and you can build it to exact dimensions. Use 3/4-inch (19mm) plywood (birch or pine), front-opening sliding glass or hinged doors, and mesh ventilation panels covering 30–40% of the top. Never use a solid top — airflow is how you control humidity.
Seal every interior surface with 2–3 coats of water-based polyurethane or Polycrylic before the enclosure is used. Unsealed wood warps, absorbs moisture, and molds. I’d also strongly recommend tiling the interior floor with plain ceramic tile set with non-toxic adhesive — it’s far more durable than polyurethane alone and makes cleaning dramatically easier. Let everything cure for at least 72 hours before adding animals or substrate.
PVC Enclosures: Worth the Extra Cost
If you’d rather not build, PVC enclosures are excellent. They’re moisture-resistant, retain heat well, and look clean. Zen Habitats makes a solid 4×2×2 that works well for small to medium species. You’ll pay more than a DIY build, but less than ongoing vet bills from a bad setup.
Glass Tanks: Fine for Juveniles, Wrong for Adults
Glass bleeds heat. Maintaining a 95–105°F warm-side ambient in a glass tank is genuinely difficult — you’ll be running high-wattage bulbs constantly and still struggling. I’ve watched keepers burn through multiple bulbs trying to heat a 40-gallon glass tank for an adult ornate uromastyx. For juveniles under 12 months with careful supplemental heating, glass is workable. For adults, it’s not the right tool.
How to Build a Uromastyx Enclosure: Heating Setup
Basking Temperature Is the One Thing You Can’t Compromise
A basking surface of 120–135°F isn’t a preference — it’s a physiological requirement. Always measure with an infrared thermometer gun directly on the rock surface. (Etekcity Lasergrip 774) Air temperature readings are misleading and will lie to you.
Halogen PAR38 or PAR30 flood bulbs are the right choice for basking — more efficient than incandescent, better light spectrum. Wattage depends on enclosure size and room temperature, typically 75–250W. Mount them in a deep dome ceramic fixture rated for 150W or more. If your basking surface isn’t hitting temperature, try raising the rock platform before swapping to a higher-wattage bulb — getting the animal 3–4 inches closer to the bulb can raise surface temps by 10–15°F without changing anything else.
Heat goes at one end only. The basking zone sits at one end, the cool side genuinely cools off at the other. Centering the heat source or putting heat at both ends destroys the gradient and removes the animal’s ability to thermoregulate.
Supplemental and Nighttime Heating
If your room drops below 70°F at night, you need supplemental heat. A radiant heat panel mounted inside the top of the enclosure works well; so does a ceramic heat emitter (CHE) on a thermostat for overnight use. Skip under-tank heaters — uromastyx are dorsal baskers and don’t thermoregulate from below.
A dimming thermostat is worth every penny. The Herpstat 1 and Inkbird ITC-306T are both reliable options at different price points. Set the probe about 6 inches from the basking bulb at basking surface level.
UVB Lighting for Uromastyx
Without intense UVB, uromastyx can’t synthesize vitamin D3, calcium metabolism breaks down, and metabolic bone disease follows. A 5.0 coil bulb or a T8 tube isn’t going to cut it for this species.
Use a T5 HO fixture running an Arcadia 12% Desert bulb or Zoo Med ReptiSun 10.0 T5 HO. The tube should span 50–75% of the enclosure length. For enclosures 60” or longer, use two overlapping fixtures or a single long-format fixture.
Target a UV Index of 4.0–6.0+ in the basking zone, with the animal 8–12 inches from the bulb surface. The bulb cannot be mounted on top of glass — glass blocks UVB entirely. Replace bulbs every 6–12 months even if they’re still producing visible light; UV output degrades well before the bulb burns out.
Run 12–14 hours of light in summer and drop to 10–12 hours in winter. This seasonal variation matters more than most keepers realize — it influences digestion, activity levels, and long-term health. A lot of people skip this step and then wonder why their animals seem sluggish or off in winter.
Substrate, Decor, and Furnishings
Substrate: Depth Matters More Than Brand
Uromastyx need to burrow. It’s not optional enrichment — it’s a behavioral need. Provide at least 4–6 inches of loose substrate.
Good options:
- Washed play sand (hardware store, not pet store) — cheap, functional, easy to source
- 60–70% play sand / 30–40% organic topsoil — better for stable burrows that don’t collapse
- Excavator clay — lets the animal sculpt burrows that hold their shape
My preferred setup is a hybrid: ceramic or slate tile under the basking zone for easy cleaning and heat retention, with a deep sand/soil mix on the cool side where the animal will actually burrow. Best of both worlds.
Avoid calcium sand (impaction risk), walnut shell, and any cedar or pine shavings.
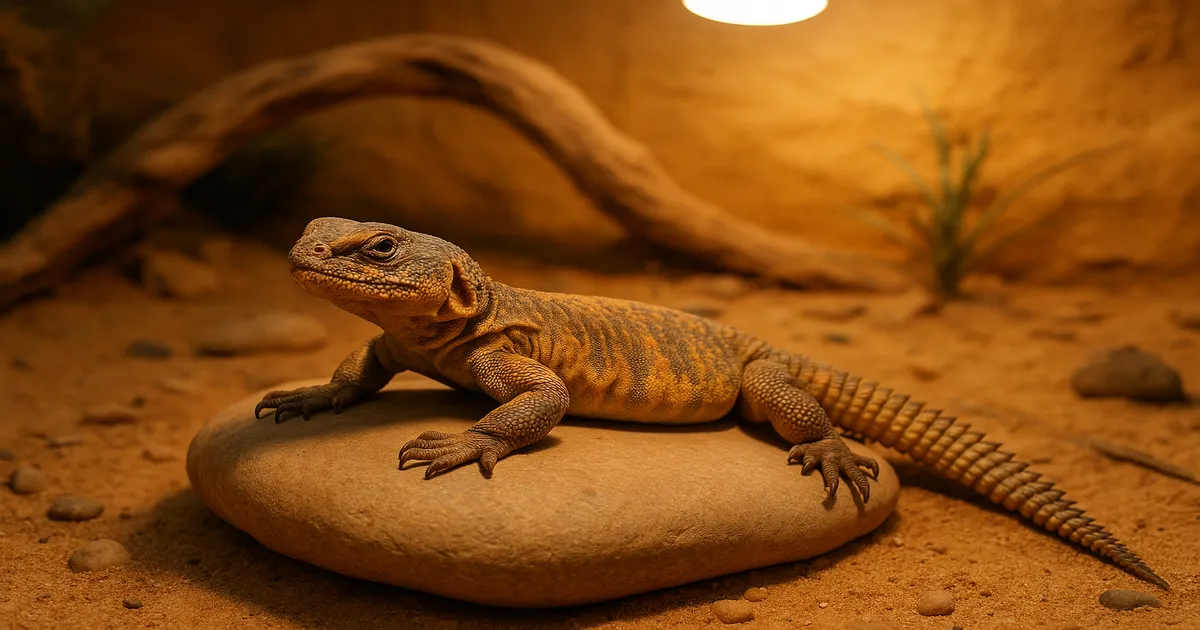
Basking Platform and Hides
Stack flat sandstone, slate, or flagstone directly under the heat and UVB source. The basking platform should be the highest point in the enclosure — this brings the animal closer to both the heat bulb and the UVB tube simultaneously.
On the cool end, provide a cork bark tube or a 4–6 inch diameter PVC pipe section as a hide. An animal that feels exposed on the cool side will spend less time out basking, which defeats the whole thermal setup.
Humidity and Water Dishes
Keep humidity at 10–25% RH. A permanent water dish will push humidity up and can trigger respiratory infections. Uromastyx get their moisture from food — leafy greens, seeds, flowers. For juveniles, a very shallow dish can be offered once or twice a week, then removed. Adults in a well-fed setup don’t need one at all.
Setting Up the Enclosure: Step by Step
-
Build or source the enclosure and allow cure time. If you’ve built a wooden enclosure, apply 2–3 coats of water-based polyurethane or tile the floor, then wait at least 72 hours.
-
Install lighting and heating hardware. Mount the T5 HO UVB fixture and basking dome at the same end. Run wiring cleanly and position the thermostat probe at basking surface level, about 6 inches from the bulb.
-
Add substrate and furnishings. Lay tile under the basking zone, then add 4–6 inches of sand or sand/soil mix on the cool side. Stack the basking rock platform under the heat and UVB source. Add a hide on the cool end.
-
Map the thermal gradient over 24 hours. Turn everything on and spend a full day measuring temperatures with your IR gun at 15-minute intervals across the entire floor. You want a clear, consistent hot-to-cool progression. Adjust rock height or bulb position as needed. Most people skip this step — don’t.
-
Verify humidity and fine-tune ventilation. Check hygrometer readings on both sides. If humidity is running high, increase ventilation. If it’s too low in an arid climate, solid side panels with a few drilled 1/2-inch holes near the top can help retain just enough moisture.
-
Introduce your uromastyx. Pre-heat the enclosure fully before the first feeding. Wait until the animal has been basking for 1–2 hours before offering food — a lizard that hasn’t reached full body temperature shouldn’t be eating.
Common Mistakes to Avoid
Insufficient basking temperature is the most common and most damaging mistake. Many beginners use a 60W bulb and assume it’s fine without ever measuring surface temp. Always verify with an IR gun.
Using glass for an adult makes maintaining proper ambient temperatures nearly impossible. If you’re past the juvenile stage, switch to wood or PVC.
Shallow substrate — 1–2 inches prevents natural burrowing and causes chronic stress. Four to six inches is the minimum.
Weak or incorrectly installed UVB — a T8 tube, a 5.0 coil, or any bulb mounted on top of glass will not deliver adequate UV. Both the bulb type and the installation matter.
Centrally placed heat source eliminates the thermal gradient. Heat at one end only.
Unsealed wood will warp and mold. Seal everything, then seal it again.
Permanent water dish raises humidity. Remove it.
Housing males together will result in serious injury or death. No exceptions.
Frequently Asked Questions
What size enclosure does a uromastyx need?
It depends on the species. Small adults like U. ornata and U. geyri need at least 48” × 24” × 24”. Medium species like U. acanthinura need 60” × 24” × 24”, and large species like U. aegyptia need 72”–96” × 24”–36” × 24”. Juveniles can start in a 36” × 18” × 18” enclosure, but plan to upgrade within the first year.
What basking temperature does a uromastyx need?
The basking surface should reach 120–135°F (49–57°C), measured with an infrared gun directly on the rock — not in the air above it. A surface below 115°F is insufficient for proper digestion and immune function.
Can I use a glass tank for a uromastyx?
For juveniles under 12 months, a glass enclosure is workable if you manage supplemental heating carefully. For adults, it’s a poor choice — glass loses heat too quickly to maintain the required ambient temperatures without running expensive, high-wattage heating around the clock. Front-opening wood or PVC enclosures are far more effective.
What’s the best substrate for a uromastyx enclosure?
Washed play sand at 4–6 inches deep is affordable and functional. A mix of 60–70% play sand and 30–40% organic topsoil (no fertilizers) is better for stable burrows. My preferred setup is ceramic tile under the basking zone for easy cleaning, with a deep sand/soil mix on the cool side where the animal will actually dig.
Do uromastyx need a water dish?
No — and a permanent water dish can cause problems by pushing humidity above 25%. Uromastyx get moisture from their food: leafy greens, seeds, and flowers. For juveniles, a very shallow dish can be offered once or twice a week and then removed. Adults in a well-fed setup don’t need one.